


本节引言:
嘿嘿,看到这个题目,相信部分读者会问,你前面的Fragment写完了吗?嗯,没写完,因为想例子,需要一点时间,为了提高效率,所以决定像多线程一样,并发的来写教程,这样可能可以加快写教程的进度,到现在为止,刚好写了60篇,离完成入门教程还很远呢,而前面也说过,想在一个半到两个月之内完成这套教程,今天已经9.1号了,要加吧劲~好的,废话就这么多,本节给大家介绍的是Android数据存储与访问方式中的一个——文件存储与读写,当然除了这种方式外,我们可以存到SharedPreference,数据库,或者Application中,当然这些后面都会讲,嗯,开始本节内容~
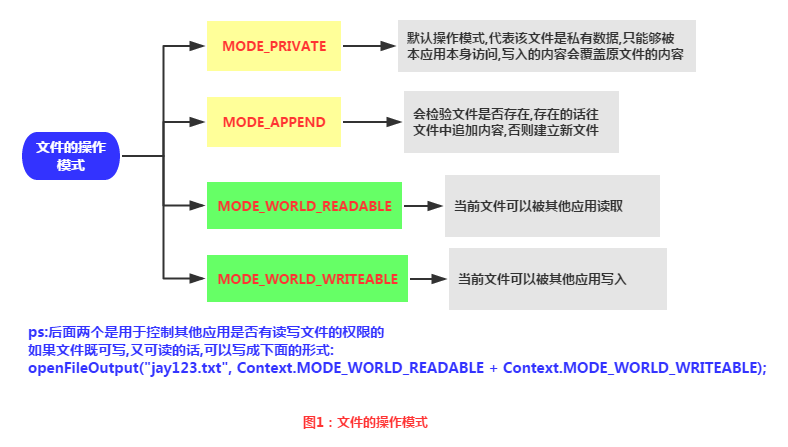
1.Android文件的操作模式
学过Java的同学都知道,我们新建文件,然后就可以写入数据了,但是Android却不一样,因为Android是基于Linux的,我们在读写文件的时候,还需加上文件的操作模式,Android中的操作模式如下:
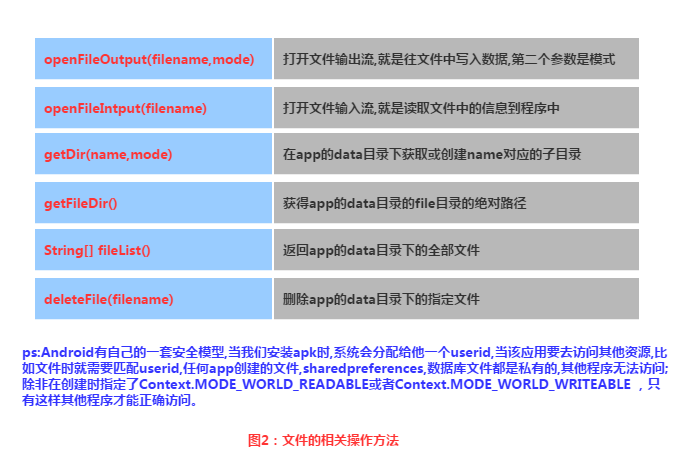
2.文件的相关操作方法
3.文件读写的实现
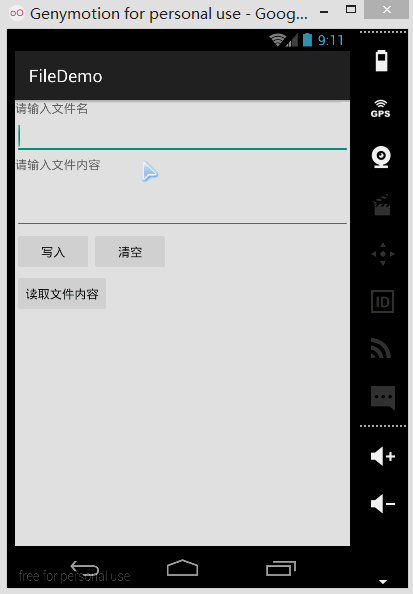
Android中的文件读写和Java中的文件I/O相同,流程也很简单,下面我们来写个简单的示例:
实现效果图:
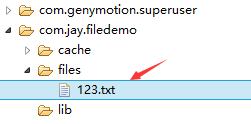
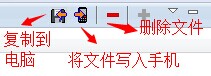
PS:这里用的是模拟器,因为笔者的N5并没有root,看不到文件的存储目录,下面我们打开DDMS的File Exploer可以看到,在data/data/<包名>/file中有我们写入的文件:
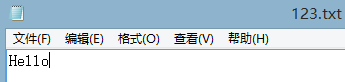
我们可以点击右上角的响应图标将文件导入到电脑中,并且打开验证写入的内容:
代码实现:
首先是布局文件:main_activity.xml
<LinearLayout xmlns:android="https://schemas.android.com/apk/res/android" xmlns:tools="https://schemas.android.com/tools" android:id="@+id/LinearLayout1" android:layout_width="match_parent" android:layout_height="match_parent" android:orientation="vertical" tools:context="com.jay.example.filedemo1.MainActivity"> <TextView android:layout_width="wrap_content" android:layout_height="wrap_content" android:text="@string/nametitle" /> <EditText android:id="@+id/editname" android:layout_width="match_parent" android:layout_height="wrap_content" /> <TextView android:layout_width="wrap_content" android:layout_height="wrap_content" android:text="@string/detailtitle" /> <EditText android:id="@+id/editdetail" android:layout_width="match_parent" android:layout_height="wrap_content" android:minLines="2" /> <LinearLayout android:layout_width="fill_parent" android:layout_height="wrap_content" android:orientation="horizontal"> <Button android:id="@+id/btnsave" android:layout_width="wrap_content" android:layout_height="wrap_content" android:text="@string/btnwrite" /> <Button android:id="@+id/btnclean" android:layout_width="wrap_content" android:layout_height="wrap_content" android:text="@string/btnclean" /> </LinearLayout> <Button android:id="@+id/btnread" android:layout_width="wrap_content" android:layout_height="wrap_content" android:text="@string/btnread" /></LinearLayout>
然后我们来写一个文件协助类:FileHelper.java
/** * Created by Jay on 2015/9/1 0001. */public class FileHelper { private Context mContext; public FileHelper() { } public FileHelper(Context mContext) { super(); this.mContext = mContext; } /* * 这里定义的是一个文件保存的方法,写入到文件中,所以是输出流 * */ public void save(String filename, String filecontent) throws Exception { //这里我们使用私有模式,创建出来的文件只能被本应用访问,还会覆盖原文件哦 FileOutputStream output = mContext.openFileOutput(filename, Context.MODE_PRIVATE); output.write(filecontent.getBytes()); //将String字符串以字节流的形式写入到输出流中 output.close(); //关闭输出流 } /* * 这里定义的是文件读取的方法 * */ public String read(String filename) throws IOException { //打开文件输入流 FileInputStream input = mContext.openFileInput(filename); byte[] temp = new byte[1024]; StringBuilder sb = new StringBuilder(""); int len = 0; //读取文件内容: while ((len = input.read(temp)) > 0) { sb.append(new String(temp, 0, len)); } //关闭输入流 input.close(); return sb.toString(); }}最后是MainActivity.java,我们在这里完成相关操作:
public class MainActivity extends AppCompatActivity implements View.OnClickListener { private EditText editname; private EditText editdetail; private Button btnsave; private Button btnclean; private Button btnread; private Context mContext; @Override protected void onCreate(Bundle savedInstanceState) { super.onCreate(savedInstanceState); setContentView(R.layout.activity_main); mContext = getApplicationContext(); bindViews(); } private void bindViews() { editdetail = (EditText) findViewById(R.id.editdetail); editname = (EditText) findViewById(R.id.editname); btnclean = (Button) findViewById(R.id.btnclean); btnsave = (Button) findViewById(R.id.btnsave); btnread = (Button) findViewById(R.id.btnread); btnclean.setOnClickListener(this); btnsave.setOnClickListener(this); btnread.setOnClickListener(this); } @Override public void onClick(View v) { switch (v.getId()) { case R.id.btnclean: editdetail.setText(""); editname.setText(""); break; case R.id.btnsave: FileHelper fHelper = new FileHelper(mContext); String filename = editname.getText().toString(); String filedetail = editdetail.getText().toString(); try { fHelper.save(filename, filedetail); Toast.makeText(getApplicationContext(), "数据写入成功", Toast.LENGTH_SHORT).show(); } catch (Exception e) { e.printStackTrace(); Toast.makeText(getApplicationContext(), "数据写入失败", Toast.LENGTH_SHORT).show(); } break; case R.id.btnread: String detail = ""; FileHelper fHelper2 = new FileHelper(getApplicationContext()); try { String fname = editname.getText().toString(); detail = fHelper2.read(fname); } catch (IOException e) { e.printStackTrace(); } Toast.makeText(getApplicationContext(), detail, Toast.LENGTH_SHORT).show(); break; } }}4.读取SD卡上的文件
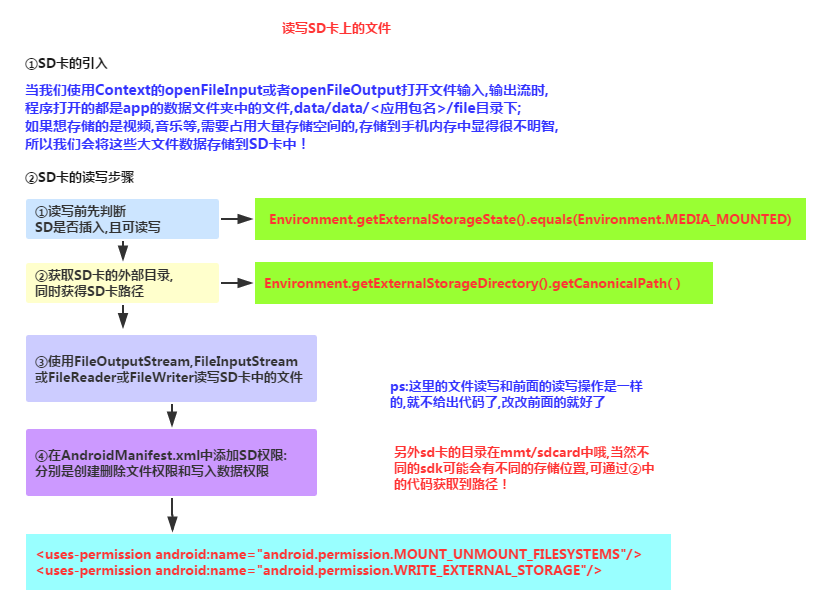
读取流程图:
代码示例:
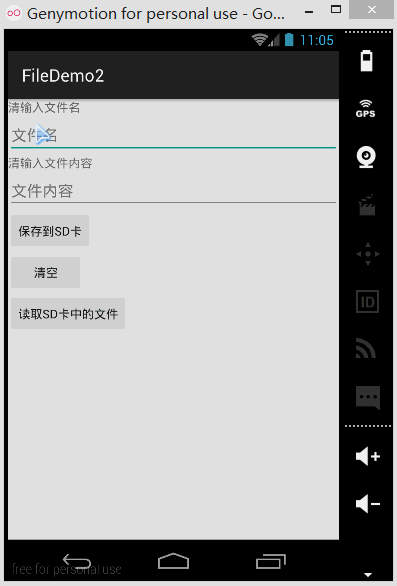
运行效果图:
同样打开DDMS的File Explorer,在旧版本的系统上我们可以直接在mmt\sdcard上找到,但是新版本的就可能需要我们自己找找了,首先我们来到这个路径下:

点开sdcard,但是没东西,我们继续找唠叨后面这个/storage/emulated/legacy下找:

好吧,他又跳到别的地方去了,我们继续找/storage/shell/emilated/0
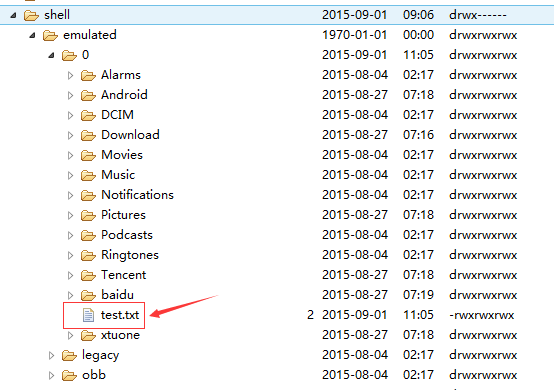
果然找到了,我们在SD卡里生成的test.txt!导出到电脑看下里面的内容:
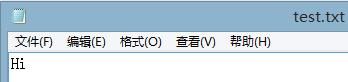
嘿嘿,果然读写SD卡成功~接下来我们来看下代码是怎么写的:
代码实现:
main_activity.xml:
<LinearLayout xmlns:android="https://schemas.android.com/apk/res/android" xmlns:tools="https://schemas.android.com/tools" android:id="@+id/LinearLayout1" android:layout_width="match_parent" android:layout_height="match_parent" android:orientation="vertical" tools:context="com.jay.example.filedemo2.MainActivity"> <TextView android:layout_width="wrap_content" android:layout_height="wrap_content" android:text="清输入文件名" /> <EditText android:id="@+id/edittitle" android:layout_width="match_parent" android:layout_height="wrap_content" android:hint="文件名" /> <TextView android:layout_width="wrap_content" android:layout_height="wrap_content" android:text="清输入文件内容" /> <EditText android:id="@+id/editdetail" android:layout_width="match_parent" android:layout_height="wrap_content" android:hint="文件内容" /> <Button android:id="@+id/btnsave" android:layout_width="wrap_content" android:layout_height="wrap_content" android:text="保存到SD卡" /> <Button android:id="@+id/btnclean" android:layout_width="wrap_content" android:layout_height="wrap_content" android:text="清空" /> <Button android:id="@+id/btnread" android:layout_width="wrap_content" android:layout_height="wrap_content" android:text="读取sd卡中的文件" /></LinearLayout>
接着我们来写一个SD操作类:SDFileHelper.java
/** * Created by Jay on 2015/9/1 0001. */public class SDFileHelper { private Context context; public SDFileHelper() { } public SDFileHelper(Context context) { super(); this.context = context; } //往SD卡写入文件的方法 public void savaFileToSD(String filename, String filecontent) throws Exception { //如果手机已插入sd卡,且app具有读写sd卡的权限 if (Environment.getExternalStorageState().equals(Environment.MEDIA_MOUNTED)) { filename = Environment.getExternalStorageDirectory().getCanonicalPath() + "/" + filename; //这里就不要用openFileOutput了,那个是往手机内存中写数据的 FileOutputStream output = new FileOutputStream(filename); output.write(filecontent.getBytes()); //将String字符串以字节流的形式写入到输出流中 output.close(); //关闭输出流 } else Toast.makeText(context, "SD卡不存在或者不可读写", Toast.LENGTH_SHORT).show(); } //读取SD卡中文件的方法 //定义读取文件的方法: public String readFromSD(String filename) throws IOException { StringBuilder sb = new StringBuilder(""); if (Environment.getExternalStorageState().equals(Environment.MEDIA_MOUNTED)) { filename = Environment.getExternalStorageDirectory().getCanonicalPath() + "/" + filename; //打开文件输入流 FileInputStream input = new FileInputStream(filename); byte[] temp = new byte[1024]; int len = 0; //读取文件内容: while ((len = input.read(temp)) > 0) { sb.append(new String(temp, 0, len)); } //关闭输入流 input.close(); } return sb.toString(); }}接着MainActivity.java实现相关逻辑:
public class MainActivity extends AppCompatActivity implements View.OnClickListener{ private EditText editname; private EditText editdetail; private Button btnsave; private Button btnclean; private Button btnread; private Context mContext; @Override protected void onCreate(Bundle savedInstanceState) { super.onCreate(savedInstanceState); setContentView(R.layout.activity_main); mContext = getApplicationContext(); bindViews(); } private void bindViews() { editname = (EditText) findViewById(R.id.edittitle); editdetail = (EditText) findViewById(R.id.editdetail); btnsave = (Button) findViewById(R.id.btnsave); btnclean = (Button) findViewById(R.id.btnclean); btnread = (Button) findViewById(R.id.btnread); btnsave.setOnClickListener(this); btnclean.setOnClickListener(this); btnread.setOnClickListener(this); } @Override public void onClick(View v) { switch (v.getId()){ case R.id.btnclean: editdetail.setText(""); editname.setText(""); break; case R.id.btnsave: String filename = editname.getText().toString(); String filedetail = editdetail.getText().toString(); SDFileHelper sdHelper = new SDFileHelper(mContext); try { sdHelper.savaFileToSD(filename, filedetail); Toast.makeText(getApplicationContext(), "数据写入成功", Toast.LENGTH_SHORT).show(); } catch(Exception e){ e.printStackTrace(); Toast.makeText(getApplicationContext(), "数据写入失败", Toast.LENGTH_SHORT).show(); } break; case R.id.btnread: String detail = ""; SDFileHelper sdHelper2 = new SDFileHelper(mContext); try { String filename2 = editname.getText().toString(); detail = sdHelper2.readFromSD(filename2); } catch(IOException e){e.printStackTrace();} Toast.makeText(getApplicationContext(), detail, Toast.LENGTH_SHORT).show(); break; } }}最后别忘记在AndroidManifest.xml写上读写SD卡的权限哦!
<!-- 在SDCard中创建与删除文件权限 --><uses-permission android:name="android.permission.MOUNT_UNMOUNT_FILESYSTEMS"/><!-- 往SDCard写入数据权限 --><uses-permission android:name="android.permission.WRITE_EXTERNAL_STORAGE"/>
5.关于原生模拟器SD卡的问题
如果是真机调试的话通常都是可以的,对于原生虚拟机的话就问题多多了,再我们前面使用Environment.getExternalStorageState().equals(Environment.MEDIA_MOUNTED)可能一直返回的是false,就是SD卡不存在,这个是主要的问题,现在新版本的SDK都会在创建AVD的时候会同时申请一块SD卡的存储区域的
对于旧版本的sdk或者其他原因可能需要手动关联下sd卡,设置如下:
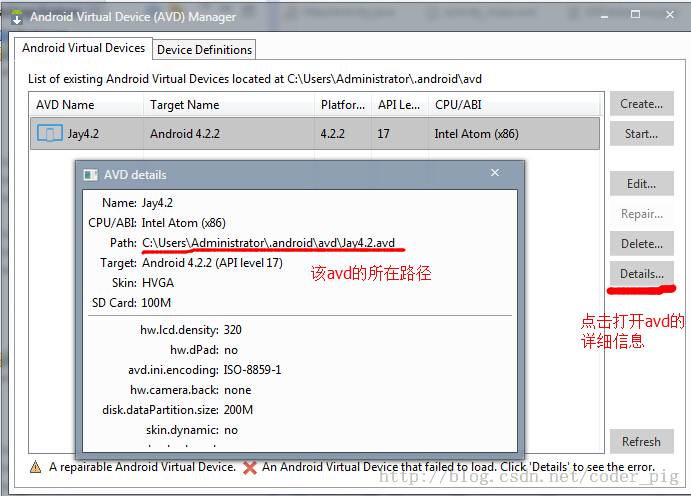
①找到创建好的avd的镜像的路径:
点击打开avd界面,点击detail,查看avd镜像的目录下②来到avd镜像所在的路径下,复制sdcard.img的路径:
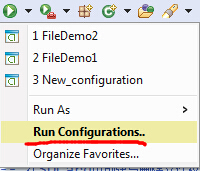
比如我的:-sdcard C:\Users\Administrator.android\avd\Jay4.2.avd\sdcard.img③接着点击
来到以下界面:
最后apply以下,然后Run就可以了!

 来到以下界面:
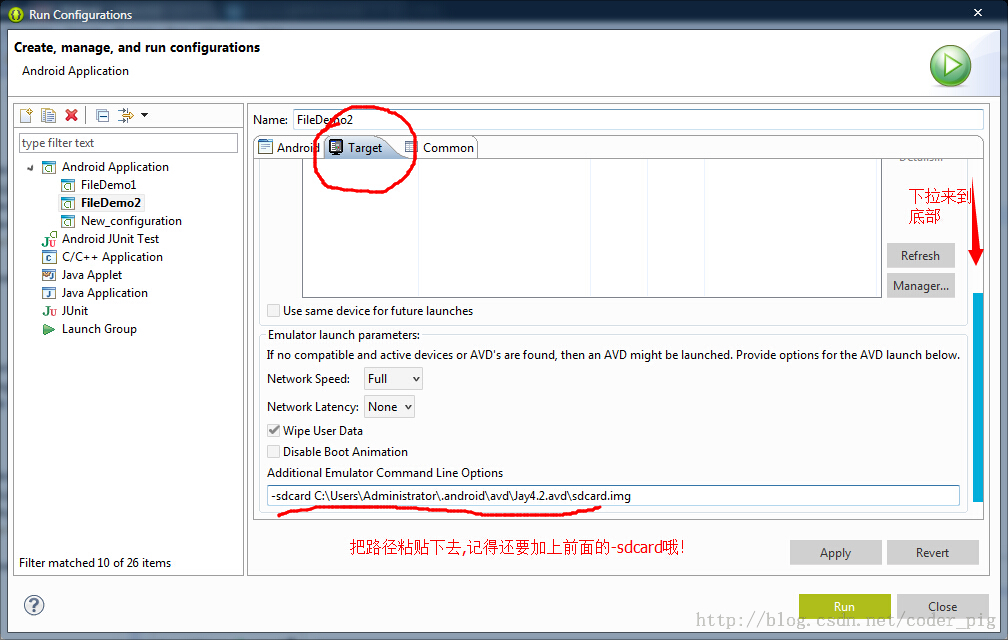
6.读取raw和assets文件夹下的文件
相信大家对两个文件夹并不陌生,如果我们不想自己的文件被编译成二进制文件的话,我们可以把文件放到这两个目录下,而两者的区别如下:
- res/raw:文件会被映射到R.java文件中,访问的时候直接通过资源ID即可访问,而且他不能有目录结构,就是不能再创建文件夹
- assets:不会映射到R.java文件中,通过AssetManager来访问,能有目录结构,即,可以自行创建文件夹
读取文件资源:
res/raw:
InputStream is =getResources().openRawResource(R.raw.filename);
assets:
AssetManager am = getAssets(); InputStream is = am.open("filename");代码下载:
- FileDemo.zip:下载 FileDemo.zip
- FileDemo2.zip:下载 FileDemo2.zip
本节小结:
好的,关于Android的数据存储与访问的第一节——文件读写就到这里,如果在学习本文中遇到什么问题,或者觉得有些纰漏的地方,欢迎提出,万分感激,谢谢~