


1.构造方法详解
1)BitmapShader(图像渲染)
BitmapShader(Bitmap bitmap, Shader.TileMode tileX, Shader.TileMode tileY)
使用一张位图作为纹理来对某一区域进行填充,参数依次:
- bitmap:用来作为填充的位图;
- tileX:X轴方向上位图的衔接形式;
- tileY:Y轴方向上位图的衔接形式;
而这个Shader.TileMode有三种:
- CLAMP就是如果渲染器超出原始边界范围,则会复制边缘颜色对超出范围的区域进行着色
- REPEAT则是平铺形式重复渲染
- MIRROR则是在横向和纵向上以镜像的方式重复渲染位图。
2)ComposeShader(混合渲染)
ComposeShader(Shader shaderA, Shader shaderB, PorterDuff.Mode mode)
渲染效果的叠加,看到PorterDuff就知道什么了吧?比如将BitmapShader与LinearGradient的混合渲染效果等。参数依次:
- shaderA:第一种渲染效果
- shaderB:第二种渲染效果
- mode:两种渲染效果的叠加模式
3)LinearGradient(线性渲染)
LinearGradient(float x0, float y0, float x1, float y1, int[] colors, float[] positions, Shader.TileMode tile);
实现某一区域内颜色的线性渐变效果,参数依次是:
- x0:渐变的起始点x坐标
- y0:渐变的起始点y坐标
- x1:渐变的终点x坐标
- y1:渐变的终点y坐标
- colors:渐变的颜色数组
- positions:颜色数组的相对位置
- tile:平铺方式
4)RadialGradient(环形渲染)
public RadialGradient (float x, float y, float radius, int[] colors, float[] positions, Shader.TileMode tile);
实现某一区域内颜色的环形渐变效果,参数依次是:
- x:环形的圆心x坐标
- y:环形的圆心y坐标
- radius:环形的半径
- colors:环形渐变的颜色数组
- positions:指定颜色数组的相对位置
- tile:平铺方式
5)SweepGradient(梯度渲染)
public SweepGradient (float cx, float cy, int[] colors, float[] positions)
扫描渲染,就是以某个点位中心旋转一周所形成的效果!参数依次是:
- cx:扫描的中心x坐标
- cy:扫描的中心y坐标
- colors:梯度渐变的颜色数组
- positions:指定颜色数组的相对位置
可能从文字上我们可以简单的知道下他们对应的一个大概作用,但是我们还是写个代码来验证下他们所起的作用,毕竟有码(图)有真相吗~
2.使用代码示例:
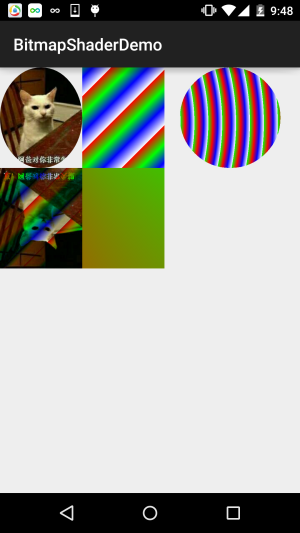
运行效果图:
实现代码:
BitmapShaderView.java:
/** * Created by Jay on 2015/11/4 0030. */public class BitmapShaderView extends View { private Bitmap mBitmap = null; private ShapeDrawable sDrawable = null; private Paint mPaint = null; private int bitW = 0, bitH = 0; //Bitmap宽高 private Shader mBitmapShader = null; //Bitmap渲染 private Shader mLinearGradient = null; //线性渐变渲染 private Shader mComposeShader = null; //混合渲染 private Shader mRadialGradient = null; //环形渐变渲染 private Shader mSweepGradient = null; //梯度渲染 public BitmapShaderView(Context context) { this(context, null); } public BitmapShaderView(Context context, AttributeSet attrs) { super(context, attrs); init(); } public BitmapShaderView(Context context, AttributeSet attrs, int defStyleAttr) { super(context, attrs, defStyleAttr); } private void init() { mBitmap = BitmapFactory.decodeResource(getResources(), R.mipmap.img_cat); bitW = mBitmap.getWidth(); bitH = mBitmap.getHeight(); mPaint = new Paint(); //创建BitmapShader mBitmapShader = new BitmapShader(mBitmap, Shader.TileMode.MIRROR, Shader.TileMode.MIRROR); //创建LinearGradient并设置渐变的颜色数组 mLinearGradient = new LinearGradient(0, 0, 100, 100, new int[]{Color.RED, Color.GREEN, Color.BLUE, Color.WHITE}, null, Shader.TileMode.REPEAT); //混合渲染,这里使用了BitmapShader和LinearGradient进行混合,可以试试其他~ mComposeShader = new ComposeShader(mBitmapShader, mLinearGradient, PorterDuff.Mode.DARKEN); //环形渐变渲染 mRadialGradient = new RadialGradient(50, 200, 50, new int[]{Color.GREEN, Color.RED, Color.BLUE, Color.WHITE}, null, Shader.TileMode.REPEAT); //梯度渲染 mSweepGradient = new SweepGradient(30, 30, new int[]{Color.GREEN, Color.RED, Color.BLUE, Color.WHITE}, null); } @Override protected void onDraw(Canvas canvas) { super.onDraw(canvas); //将图片裁剪为椭圆形 sDrawable = new ShapeDrawable(new OvalShape()); sDrawable.getPaint().setShader(mBitmapShader); sDrawable.setBounds(0, 0, bitW, bitH); sDrawable.draw(canvas); //绘制线性渐变的矩形 mPaint.setShader(mLinearGradient); canvas.drawRect(bitW, 0, bitW * 2, bitH, mPaint); //绘制混合渲染效果 mPaint.setShader(mComposeShader); canvas.drawRect(0, bitH, bitW , bitH * 2, mPaint); //绘制环形渐变 mPaint.setShader(mRadialGradient); canvas.drawCircle(bitW * 2.8f, bitH / 2, bitH / 2, mPaint); //绘制梯度渐变 mPaint.setShader(mSweepGradient); canvas.drawRect(bitW, bitH, bitW * 2, bitH * 2, mPaint); }}就那么一百来行代码,就不用解释了吧,如果觉得有疑惑的,动手试试~
3.本节代码下载:
本节小结:
本节给大家介绍了Paint的另一个API:Shader(图像渲染),又让我们的画笔增添了一种选择~如果你看到代码有疑惑,不懂把代码粘下,改改参数,就懂了~好的,本节就到这里,谢谢~