


�������ԣ�
����һ�������Ƕ�HttpURLConnection������ѧϰ�����ڵ��ڶ��ַ�ʽ��HttpClient�����ܱ�Google�����ˣ�������������ƽʱҲ������HttpClient��ץ�°������Jsoup������ҳЧ�����ѣ�HttpClient���ڽ���/����Http����/��Ӧ�����������������Ӧ����ִ��HTMLҳ��DZ���JS���룬�����ҳ�����ݽ����κν�������������ʼ�������ݣ�
1.HttpClientʹ������
����������
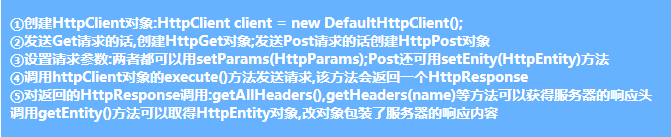
2.HttpClientʹ��ʾ��
1��ʹ��HttpClient����GET����
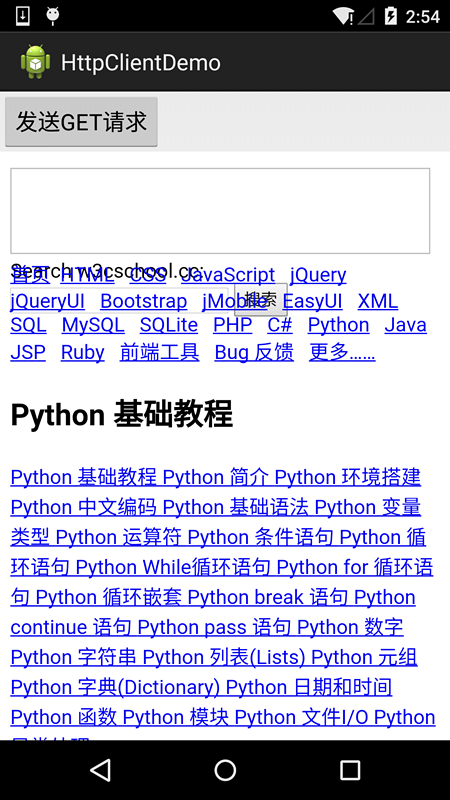
ֱ�����¼ķ���Get����Ĵ��룺
public class MainActivity extends Activity implements OnClickListener { private Button btnGet; private WebView wView; public static final int SHOW_DATA = 0X123; private String detail = ""; private Handler handler = new Handler() { public void handleMessage(Message msg) { if(msg.what == SHOW_DATA) { wView.loadDataWithBaseURL("",detail, "text/html","UTF-8",""); } }; }; @Override protected void onCreate(Bundle savedInstanceState) { super.onCreate(savedInstanceState); setContentView(R.layout.activity_main); initView(); setView(); } private void initView() { btnGet = (Button) findViewById(R.id.btnGet); wView = (WebView) findViewById(R.id.wView); } private void setView() { btnGet.setOnClickListener(this); wView.getSettings().setDomStorageEnabled(true); } @Override public void onClick(View v) { if (v.getId() == R.id.btnGet) { GetByHttpClient(); } } private void GetByHttpClient() { new Thread() { public void run() { try { HttpClient httpClient = new DefaultHttpClient(); HttpGet httpGet = new HttpGet("https://www.w3cschool.cc/python/python-tutorial.html"); HttpResponse httpResponse = httpClient.execute(httpGet); if (httpResponse.getStatusLine().getStatusCode() == 200) { HttpEntity entity = httpResponse.getEntity(); detail = EntityUtils.toString(entity, "utf-8"); handler.sendEmptyMessage(SHOW_DATA); } } catch (Exception e) { e.printStackTrace(); } }; }.start(); }}���н�ͼ
���⣬����Ǵ��в�����GET����Ļ������ǿ��Խ������ŵ�һ��List�����У��ٶԲ�������URL���룬����URLƴ���¾ͺ��ˣ�
List<BasicNameValuePair> params = new LinkedList<BasicNameValuePair>(); params.add(new BasicNameValuePair("user", "��С��")); params.add(new BasicNameValuePair("pawd", "123"));String param = URLEncodedUtils.format(params, "UTF-8"); HttpGet httpGet = new HttpGet("https://www.baidu.com"+"?"+param);2��ʹ��HttpClient����POST����
POST�����GET������һ�㣬������HttpPost�����ͨ��NameValuePair�������洢�ȴ��ύ�IJ����������������ݵ�UrlEncodedFormEntity�У�������setEntity(entity)��ɣ�HttpClient.execute(HttpPost)���ɣ�����Ͳ�д�����ˣ���ʱû�ҵ�Post����վ���ֲ����Լ�д��Servlet��So,ֱ�������Ĵ����~
���Ĵ���:
private void PostByHttpClient(final String url){ new Thread() { public void run() { try{ HttpClient httpClient = new DefaultHttpClient(); HttpPost httpPost = new HttpPost(url); List<NameValuePair> params = new ArrayList<NameValuePair>(); params.add(new BasicNameValuePair("user", "�����")); params.add(new BasicNameValuePair("pawd", "123")); UrlEncodedFormEntity entity = new UrlEncodedFormEntity(params,"UTF-8"); httpPost.setEntity(entity); HttpResponse httpResponse = httpClient.execute(httpPost); if (httpResponse.getStatusLine().getStatusCode() == 200) { HttpEntity entity2 = httpResponse.getEntity(); detail = EntityUtils.toString(entity2, "utf-8"); handler.sendEmptyMessage(SHOW_DATA); } }catch(Exception e){e.printStackTrace();} }; }.start();}3.HttpClientץ����ʾ��(����ϵͳ����ץȡ)
��ʵ����HttpClient�������кܶ࣬�����������������ץѧУ����ϵͳ��ѧ���Ŀγ̱�:����漰��Cookie��ģ���½�Ķ�����˵��ץ����(����)��һ�������Ǵ�����JSoup������ץ�����ݵģ�����Ȥ�����Լ�����������ϣ��������±��߱���app���ȡ��ҳ���ֵĹؼ����룡��ҿ�������£�
HttpClient����ͨ�����������ȡ������Cookie��HttpResponse loginResponse = new DefaultHttpClient().execute(getLogin);���Cookie:cookie = loginResponse.getFirstHeader("Set-Cookie").getValue();����ʱ����Cookie:httpPost.setHeader("Cookie", cookie);
//�������,ģ���¼��ʵ��:public int getConnect(String user, String key) throws Exception { // �ȷ���get���� ��ȡcookieֵ��__ViewStateֵ HttpGet getLogin = new HttpGet(true_url); // ��һ��:��Ҫ��HTML: String loginhtml = ""; HttpResponse loginResponse = new DefaultHttpClient().execute(getLogin); if (loginResponse.getStatusLine().getStatusCode() == 200) { HttpEntity entity = loginResponse.getEntity(); loginhtml = EntityUtils.toString(entity); // ��ȡ��Ӧ��cookieֵ cookie = loginResponse.getFirstHeader("Set-Cookie").getValue(); System.out.println("cookie= " + cookie); } // �ڶ���:ģ���¼ // ����Post����,��ֹ�ض��� HttpPost httpPost = new HttpPost(true_url); httpPost.getParams().setParameter(ClientPNames.HANDLE_REDIRECTS, false); // ����Post�ύ��ͷ��Ϣ�IJ��� httpPost.setHeader("User-Agent", "Mozilla/5.0 (Windows NT 6.3; WOW64; Trident/7.0; rv:11.0) like Gecko"); httpPost.setHeader("Referer", true_url); httpPost.setHeader("Cookie", cookie); // ������������ List<NameValuePair> params = new ArrayList<NameValuePair>(); params.add(new BasicNameValuePair("__VIEWSTATE", getViewState(loginhtml)));// __VIEWSTATE����������仯���Զ�̬ץȡ��ȡ params.add(new BasicNameValuePair("Button1", "")); params.add(new BasicNameValuePair("hidPdrs", "")); params.add(new BasicNameValuePair("hidsc", "")); params.add(new BasicNameValuePair("lbLanguage", "")); params.add(new BasicNameValuePair("RadioButtonList1", "%D1%A7%C9%FA")); params.add(new BasicNameValuePair("txtUserName", user)); params.add(new BasicNameValuePair("TextBox2", key)); params.add(new BasicNameValuePair("txtSecretCode", "")); // ( �s���t )��������,��Ȼ����Ҫ��֤�� // ���ñ��뷽ʽ,��Ӧ����,��ȡ��Ӧ״̬��: httpPost.setEntity(new UrlEncodedFormEntity(params, "gb2312")); HttpResponse response = new DefaultHttpClient().execute(httpPost); int Status = response.getStatusLine().getStatusCode(); if(Status == 200)return Status; System.out.println("Status= " + Status); // �ض���״̬��Ϊ302 if (Status == 302 || Status == 301) { // ��ȡͷ����Ϣ��Location��ֵ location = response.getFirstHeader("Location").getValue(); System.out.println(location); // ������:��ȡ������Ϣ����ҳ�� // Get���� HttpGet httpGet = new HttpGet(ip_url + location);// ����location��ַ���� httpGet.setHeader("Referer", true_url); httpGet.setHeader("Cookie", cookie); // ��ҳ��html mainhtml = ""; HttpResponse httpResponseget = new DefaultHttpClient() .execute(httpGet); if (httpResponseget.getStatusLine().getStatusCode() == 200) { HttpEntity entity = httpResponseget.getEntity(); mainhtml = EntityUtils.toString(entity); } } return Status;}4.ʹ��HttpPut����Put����
ʾ������������
public static int PutActCode(String actCode, String licPlate, Context mContext) { int resp = 0; String cookie = (String) SPUtils.get(mContext, "session", ""); HttpPut httpPut = new HttpPut(PUTACKCODE_URL); httpPut.setHeader("Cookie", cookie); try { List<NameValuePair> params = new ArrayList<NameValuePair>(); params.add(new BasicNameValuePair("activation_code", actCode)); params.add(new BasicNameValuePair("license_plate", licPlate)); httpPut.setEntity(new UrlEncodedFormEntity(params, "UTF-8")); HttpResponse course_response = new DefaultHttpClient().execute(httpPut); if (course_response.getStatusLine().getStatusCode() == 200) { HttpEntity entity2 = course_response.getEntity(); JSONObject jObject = new JSONObject(EntityUtils.toString(entity2)); resp = Integer.parseInt(jObject.getString("status_code")); return resp; } } catch (Exception e) { e.printStackTrace(); } return resp;}�����
�õģ����ڹ���Android HTTP�ĵڶ�������ʽ:HttpClient�͵�����½ڿ�ʼ������ѧϰXML�Լ�Json�Ľ��������ھ͵����лл~